
Developing for Yocto-based embedded Linux: A browser-based QEMU lab using Docker
Introduction
Over the years, I have built numerous embedded Linux distributions using the Yocto Project for both personal and professional projects, including my Diya initiative. These systems have targeted a wide variety of hardware platforms, ranging from Raspberry Pi boards and PinePhones to USB 4G/LTE modems and other custom devices.
While Yocto provides tremendous flexibility for building custom Linux operating systems, application development for embedded targets often remains challenging. One of the biggest obstacles is the constant dependency on physical hardware for testing and validation, even when the applications themselves are largely hardware-independent.
This raises an interesting question:
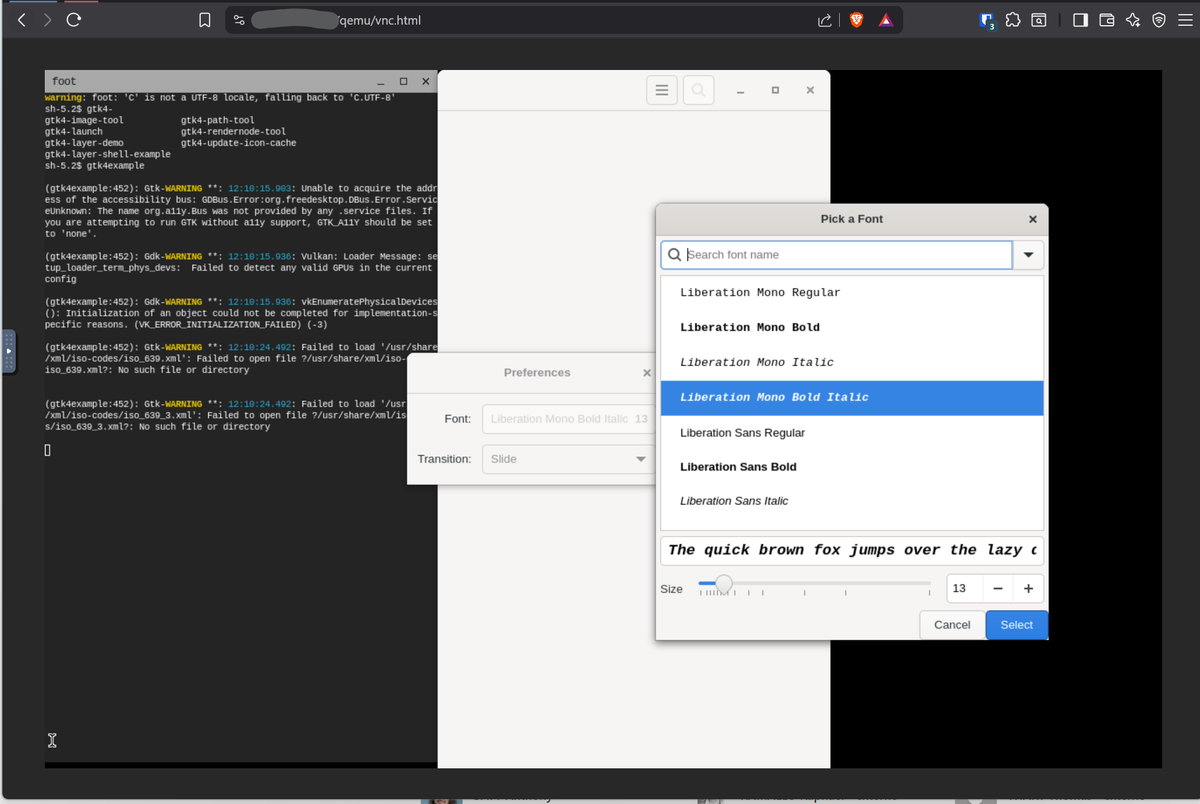
What if you could build, boot, and test your entire embedded Linux system, including its graphical interface, directly on your development workstation and access it from any web browser, without requiring the actual hardware?
In this article, I'll present a simple solution based on Docker, QEMU, and noVNC that makes embedded Linux development significantly more accessible and scalable.
The Challenge: Hardware as a development bottleneck
When building an embedded Linux distribution with Yocto, the final output is typically designed for a specific hardware platform, often ARM-based. Although this approach works well for deployment, it introduces several challenges during application development.
Hardware dependency
Developers generally need continuous access to the target device in order to deploy and test their applications.
This becomes problematic when:
- Devices are shared among multiple developers.
- Hardware is located remotely.
- Prototype boards are scarce or expensive.
- Development requires frequent iterations.
Slow development cycle
Testing often involves a repetitive workflow:
- Build a new image.
- Copy or flash it to the target device.
- Reboot the system.
- Deploy the application.
- Verify the results.
Even a few minutes lost on every iteration can significantly impact developer productivity.
Scalability issues
Providing dedicated hardware to every member of a development team can quickly become expensive and difficult to maintain. It also introduces inconsistencies between developer environments.
Yocto already provides the solution
Fortunately, Yocto is capable of generating much more than an image for the final target hardware.
For many distributions, Yocto can also build:
- A QEMU-compatible image
- An x86_64 version of the target system
- A complete Software Development Kit (SDK)
For example:
# Build the image
MACHINE=qemux86-64 bitbake core-image-base

# Build the SDK
MACHINE=qemux86-64 bitbake core-image-base -c populate_sdk
These commands generate everything needed to run the operating system directly inside QEMU on a standard x86_64 machine.
The objective of this article is to make the use of these generated artifacts as simple as possible by packaging the entire emulation stack into a Docker container.
The solution
The idea is straightforward:
- Run the Yocto-generated image inside QEMU.
- Package the emulator in a Docker container.
- Expose the graphical display through VNC.
- Make the VNC session accessible through a standard web browser using noVNC.
The result is a fully self-contained service that can be executed on any machine capable of running Docker.
Key Benefits
- Hardware Independence: Develop and test embedded Linux applications without requiring access to the target device.
- Browser-Based Access: Access the graphical console from anywhere using nothing more than a web browser.
- Reproducible Environments: Because the entire infrastructure is containerized, every developer works with the exact same setup.
- Near-Native Performance: Using KVM hardware acceleration allows QEMU to achieve performance that is very close to native execution.
- Easy Remote Sharing: A running emulated system can be exposed as a simple web service, making demonstrations, testing, and collaboration significantly easier.
Implementation
The complete implementation is available in my Git repository.
The project is composed of three main components:
Dockerfilestart.shdocker-compose.yml
Together, they create a portable environment capable of running a complete Yocto image inside Docker.
Building the Docker Image
The Dockerfile prepares a Debian-based container with all the required tools:
FROM debian:stable-slim

RUN apt-get update && \
    apt-get install -y \
        novnc \
        websockify \
        xz-utils \
        mesa-utils \
        file socat \
        qemu-system-x86 \
        libepoxy0 \
        libegl1 \
        libgbm1 \
        libgl1-mesa-dri \
        mesa-utils && \
    rm -rf /var/lib/apt/lists/*

COPY start.sh /

ENTRYPOINT ["/start.sh"]
Break down
- Debian Base Image: The project starts from
debian:stable-slim, providing a lightweight and stable foundation. - QEMU Installation:
qemu-system-x86this package provides the emulator used to run our Yocto-generated x86_64 image. - noVNC and Websockify:
novnc websockifythese tools provide a web-based VNC client and the necessary WebSocket bridge, allowing browser access without installing any additional software. - Graphics Acceleration: Packages such as:
libegl1 libgbm1 libgl1-mesa-dri mesa-utilsenable QEMU's OpenGL acceleration capabilities through thevirtio-vga-gldevice. - QEMU Monitor Control:
socatis used to communicate with QEMU's QMP interface and dynamically set the VNC password during startup.
Launching QEMU with start.sh
The start.sh script is the heart of the solution.
#! /bin/bash

W="/emu"

# Use environment variables for image names, with default values
ROOTFS_IMAGE=${ROOTFS_IMAGE:-"core-image-base-qemux86-64.rootfs.ext4"}
KERNEL_IMAGE=${KERNEL_IMAGE:-"bzImage"}
SSH_PORT=${SSH_PORT:-2222}
NOVNC_PORT=${NOVNC_PORT:-8080}
VNC_HOST=${VNC_HOST:-localhost}
VNC_PORT=${VNC_PORT:-5900}

# Check for required environment variables that don't have defaults
[ -z "$VNC_PASSWORD" ] && { echo "VNC_PASSWORD must be set"; exit 1; }


# Check if the required files exist
[ -f "$W/$ROOTFS_IMAGE" ] || { echo "Rootfs image not found: $W/$ROOTFS_IMAGE"; exit 1; }
[ -f "$W/$KERNEL_IMAGE" ] || { echo "Kernel image not found: $W/$KERNEL_IMAGE"; exit 1; }

qemu-system-x86_64 \
    -netdev user,id=net0,hostfwd=tcp::${SSH_PORT}-:22 \
    -device virtio-net-pci,netdev=net0 \
    -append 'root=/dev/vda rw ip=dhcp' \
    -object rng-random,filename=/dev/urandom,id=rng0 \
    -device virtio-rng-pci,rng=rng0 \
    -drive file=$W/$ROOTFS_IMAGE,if=virtio,format=raw \
    -usb -device usb-tablet -usb -device usb-kbd   -cpu IvyBridge \
    -machine q35,i8042=off -smp 4 -enable-kvm -m 1048 -serial mon:vc \
    -serial null \
    -device virtio-vga-gl \
    -display egl-headless,gl=on,show-cursor=off \
    -vnc 0.0.0.0:0,password=on \
    -qmp unix:/tmp/qmp.sock,server,wait=off \
    -kernel $W/$KERNEL_IMAGE &

until [ -S /tmp/qmp.sock ]; do
    sleep 1
done

socat - UNIX-CONNECT:/tmp/qmp.sock <<EOF
{"execute":"qmp_capabilities"}
{"execute":"change-vnc-password","arguments":{"password":"${VNC_PASSWORD}"}}
EOF

websockify --web=/usr/share/novnc/ ${NOVNC_PORT} ${VNC_HOST}:${VNC_PORT}
Its responsibilities include:
- Validating image availability.
- Launching QEMU.
- Configuring networking.
- Setting the VNC password.
- Starting noVNC.
The script relies on environment variables to keep the configuration flexible and reusable across projects.
Features
Configurable Images
The script uses: ROOTFS_IMAGE and KERNEL_IMAGE environment variables to locate the Yocto-generated artifacts. This allows multiple images to be reused without modifying the container itself.
SSH Connectivity
The following QEMU configuration:
-netdev user,id=net0,hostfwd=tcp::${SSH_PORT}-:22creates a host-to-guest port forwarding rule that exposes the guest SSH service.
For example:
Host port 2222 → Guest port 22This enables SSH accessing to the VM:
ssh root@localhost -p 2222assuming SSH is enabled inside the image.
Hardware acceleration
The option -enable-kvm leverages the host CPU virtualization capabilities, dramatically improving performance.
GPU acceleration
The options -device virtio-vga-gl2-display egl-headless,gl=on allow OpenGL rendering inside the guest while keeping the emulator fully headless.
Browser-Based Display
The VM display is exposed through -vnc 0.0.0.0:0 and then bridged to the browser using: websockify and novnc
Runtime Password Configuration
Rather than storing credentials inside the image, the VNC password is configured dynamically using the QEMU monitor interface (QMP).
Orchestrating everything with Docker Compose
The docker-compose.yml file ties everything together:
services:
  qemu:
    build:
      context: .
      dockerfile: Dockerfile
    container_name: qemu
    hostname: qemu
    image: iohubdev/qemu-novnc:latest
    ports:
      - "${NOVNC_PORT}:${NOVNC_PORT}"
      - "${SSH_PORT}:${SSH_PORT}"
    devices:
      - /dev/kvm:/dev/kvm
      - /dev/dri:/dev/dri
    volumes:
      - ./emu:/emu
    restart: unless-stopped
    environment:
      VNC_HOST: ${VNC_HOST}
      VNC_PORT: ${VNC_PORT}
      VNC_PASSWORD: ${VNC_PASSWORD}
      SSH_PORT: ${SSH_PORT}
      NOVNC_PORT: ${NOVNC_PORT}
Its responsibilities include:
- Building the image.
- Exposing the required ports.
- Mapping hardware devices.
- Mounting Yocto artifacts.
- Injecting runtime configuration.
The most important section is the device mapping:
devices:
  - /dev/kvm:/dev/kvm
  - /dev/dri:/dev/dri
These mappings provide KVM acceleration and GPU acceleration inside the container. Without them, performance would be significantly reduced.
The configuration presented in this article uses /dev/dri and VirGL acceleration, which works well on most Intel and AMD systems. On NVIDIA-based hosts, GPU acceleration may require additional configuration through the NVIDIA Container Toolkit, or can simply be disabled by removing the OpenGL-related QEMU options. For most embedded application development workflows, KVM acceleration alone provides excellent performance.The following volume mapping:
volumes:
  - ./emu:/emu
makes the Yocto-generated kernel and root filesystem available to QEMU.
Usage
Ready to try it out? Here’s how to get your emulated Yocto system running.
Prepare your environment
First, create a .env file in the same directory as your docker-compose.yml to define your configuration.
# Web access port for noVNC
NOVNC_PORT=6080

# SSH port forwarding
SSH_PORT=2222

# VNC configuration (used internally by the container)
VNC_HOST=localhost
VNC_PORT=5900
VNC_PASSWORD=mysecretpassword

# Yocto-generated artifacts
ROOTFS_IMAGE=core-image-base-qemux86-64.rootfs.ext4
KERNEL_IMAGE=bzImage
Prepare the emulation volume
Create a directory named emu. This is where you will place the output from your Yocto build.
mkdir emuFrom your Yocto build output directory (tmp/deploy/images/qemux86-64), copy the following two files into the emu directory:
- The root filesystem image (e.g.,
core-image-base-qemux86-64.rootfs.ext4) - The kernel (e.g.,
bzImage)
Your directory structure should now look like this:
.
├── docker-compose.yml
├── Dockerfile
├── start.sh
├── .env
└── emu/
    ├── bzImage
    └── core-image-base-qemux86-64.rootfs.ext4
Run and access
With everything in place, launch the service using Docker Compose:
docker compose up -dDocker will build the image and start the container in the background. Now, open your web browser and navigate to:
http://localhost:6080
After entering the VNC password defined in the .env file, the console/graphic of your Yocto image will appear directly in the browser.
You now have a fully functional embedded Linux system running inside Docker, accessible from anywhere through a simple web interface.
If an SSH server is available inside the VM, you can also connect through:
ssh root@localhost -p 2222
# or any shh port defined in the .env file
or through the configured host IP address if the service is exposed remotely.
Conclusion
By combining Yocto, QEMU, Docker, and noVNC, it becomes possible to completely decouple application development from physical embedded hardware.
This approach offers a reproducible, portable, and high-performance development environment that can be accessed from virtually anywhere. Developers can build, test, debug, and demonstrate embedded Linux applications without flashing SD cards, rebooting devices, or fighting over limited hardware resources.
For individual developers, this provides a much faster feedback loop. For teams, it introduces a consistent development platform that scales far more easily than managing fleets of physical devices.
In short, if your Yocto-based applications are largely hardware-agnostic, containerized QEMU environments can significantly streamline your development workflow while maintaining a realistic representation of the final system.